
Before we start, though, you'll need to have some digital frames to work with. There are a ton of gorgeous and adorable digital frames out there. Some of my favs are found at House of 3 and Designer Digitals. Thanks to Talia, I found the vintage frames I used on the last post HERE and HERE at Designer Digitals. When you purchase them, you'll download the file and unzip it. When that is done, you'll end up with several different digital files that you can open in Photoshop.
1. Open the photo you want to add a frame to in Photoshop. Then open the frame you want to use (File>Open). You'll have 2 files open now.

2. You will now select the move tool - the arrow on your tools palette. Now, click on your photo and while holding the mouse button down, drag the mouse over to the frame. Now let go of the mouse. You should see your photo on top of the frame. It might be HUGE compared to the frame - no worries.

3. If your photo is too large to fit into the frame, click "Ctrl+T" to select the transform tool and while holding the Shift key, drag one of the corners in to resize the photo (holding the Shift key keeps the proportions the same). When it's the size you like, click on the arrow key to commit to the change.

 4. You'll notice that your photo is still on top of the frame - we don't want that! Look over to the lower right hand side of the screen, click on the frame layer, and drag it to the top of the layers palette. Now your photo will be BEHIND the frame, which is what we want.
  5. We're almost done, but there is still a problem. There is still a bit of my photo sticking out from the side of the frame. I can't make it any smaller, or there wil be a gap at the bottom of the frame. So, we're going to click on the photo layer on our layers palette so it is highlighted, then click on the Rectangular Marquee tool. I have it circled on the tools palette. It's the rectangle with the dotted line around it. Then, you're going to drag out a rectangle around the part of the photo that is sticking out. You can see what I mean in the photo below. Once that's outlined like below, simply click "delete" on your keyboard.
6. There! Now the icky sticking out part is gone. Like magic!

7. To get rid of the marching ants you can click on "Select>Deselect". That will remove your rectangle selection.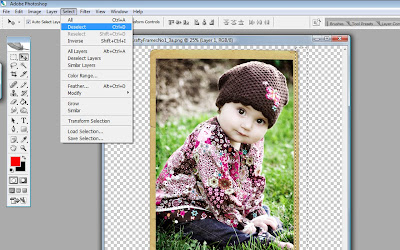

8. Now you are ready to flatten and save your image! Flatten by clicking on Layer>Flatten.

9. You will want to save this as a copy (because remember, you are working on your digital frame file which you don't want to change permenantly). So, click on File>Save As - then give it a unique name and save it in a location on your computer where you usually save photos. Done! 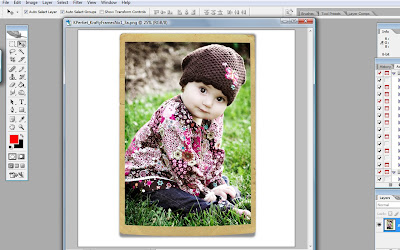

You can now use your finished image as you would any other photo. You can sharpen and resize for the web, post it on your blog, use it on a digi scrapbooking page, or order a print!

3 comments:
Thank you I have been faking this for a while--- lol- so I needed this tutorial. I love this picture of this sweet little gal- she is so cute!
Digital picture frames can be used quite effectively in homes or offices, as an informational aide, but also to help business.
nice tutorial...very useful
Post a Comment