 I had another faithful blog reader ask me a GREAT question, and I knew it would be a fun tutorial - mostly because *I* wanted to learn how to do it :) I know you've seen digital scrapbook page templates - if you need a reminder, just check out THIS TUTORIAL for a refresher.
Anyway, I'm sure you smarty pants already know how to use a digital template with several different photos/digi papers, BUT my reader's question was, how do you use ONE photo but have it fill the template squares like in the example above? I know, my verbage isn't up to par - afterall, it's late and I'm nursing a cold. But, do you know what I mean? Truth be told, I had no clue how to do it - but I had faith that even my brain could somehow find a way. Now, remember, my way to do things is not always the only way (as usual), so if you know a faster way to do this, please guide me to your blog, oh photoshop guru! Okay, let's get started, the Bobbi way :)
1. Open the template you will be working with. It should have many spots for photos on it for the best results. If you want to you can add background paper or embellishments now, or wait until later. whatever. Just open the template. THEN open the photo you want to use on the template. Drag and drop your photo onto the template by selecting the move tool, clicking on the photo, then - while holding the mouse button down - dragging it over the template document and letting up on the mouse. Your photo may be huge, or really small - you will resize it later. No worries. It may also be on top of the template like in the sample below, or the photo may appear beneath a few layers. If it is beneath a few layers, click on the photo layer in the layers palette and drag it to the top of the layers palette.
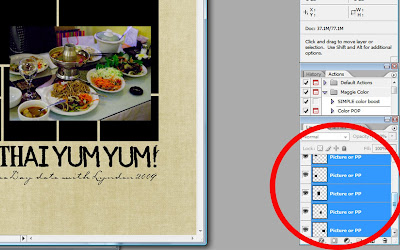
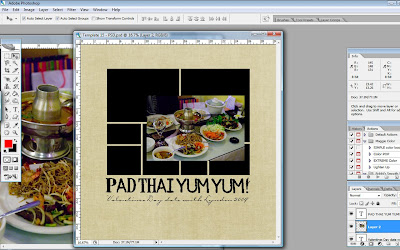 2. While you are looking in your layers palette, we can do the next step. You should be able to see a separate layer for each different square or rectangle on the template. That allows for several different photos/papers to be used. We want to merge these layers together into ONE layer because we are using ONE photo, right? Right. Okay, so click on one, then hold the Ctrl key down and click on each separate shape in the template until they are all highlighted. Remember, you are ONLY highlighting the parts in the collage - not the background layers, or text layers, or whatever. Just the parts of the template that make up the collage.
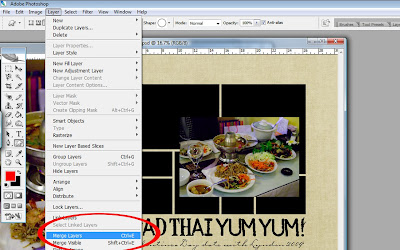
 3. Click on Layer>Merge Layers. This will merge them into ONE layer.
 You can see that the separate shapes in the collage are now saved onto the same layer. If you need to see this screen shot (or any others) bigger, just click on it.
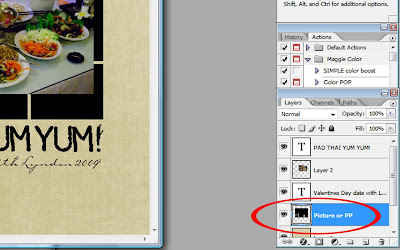 4. NOW you can resize your photo (Ctrl+T) to be large enough to cover the squares. You should see where we are going with this... clipping mask, anyone?
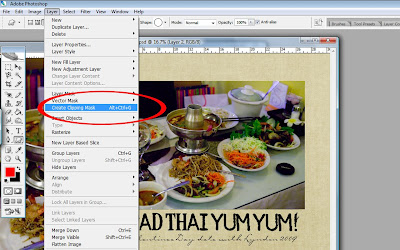
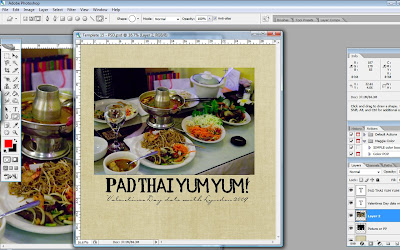 5. Now, make sure your photo is exactly one layer above the shapes layer we merged a couple of steps back (Do you know what I mean by the shapes layer?) You can see in my previous screen shot that my photo is directly above the shapes layer in my layers palette. Make sure the photo is highligted, then click on Layer>Create Clipping Mask.
 5. Voila! Your photo should now be broken into the separate squares in the template. A one photo collage.
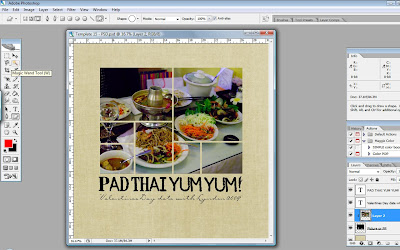 Dress is up however you'd like and you're good to go!

4 comments:
Hi Bobbi,
thanks for your great tutorial!
Now i know how to do it.
I might come back with some more questions in the future if you don't mind because i'm a beginning digi scrapper :-)
Ada
Hey Bobbi - I tried to download this template and it says it is not a valid link. Can you get it to me another way? Judy
THanks for this tutorial. I recently downloaded a puzzle template that I wanted to use with one picture and this will be VERY helpful!!! Love your blog :)
This is another one of your great tuts. I just found your site today! I like your easy way of explaining things and your laid back sense of humor! Thanks for sharing this tut!
Post a Comment