

Welcome to Tutorial Tuesday! This week we are going to do a SUPER EASY technique (by request) called "selective color" or whatever you WANT to call it. LOL! Really, you will be blown away by how easy this is. This technique will work for all you elements users, and I'm sure it will be work for other photo editing programs that use layers as well. Okay, let's get it started!
1. Open your photo. I had a tough time finding a photo to demonstrate this technique, but I think this one will work fine. Make sure black is selected as your foreground color (those little boxes in the lower left hand corner). My example has white as the foreground color - just ignore that and make sure BLACK is on top and white is beneath it. An easy way to do this is to click on the tiny black and white square below it - it will reset the colors to black as foreground and white as background. This isn't as complicated as I'm making it seem :)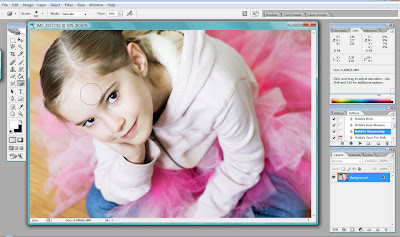 2. Create a gradient map on a new layer by clicking on "Layer>New Adjustment Layer>Gradient map>OK" Now, if you're little color squares are set with the black on top, your photo will turn black and white. If it looks like a negative, just click on the "Reverse" box and it should be fine. When your photo looks black and white click OK.
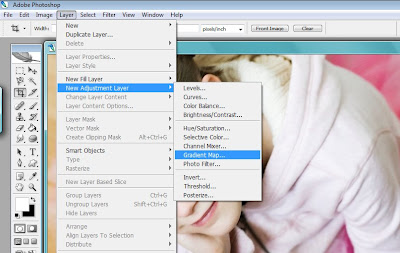
3. Now what you've done is simply put a black and white copy of your photo on top of the color one. All you will do now is choose a soft edge brush, set the opacity at about 20 - 30% and paint over the part of the photo where you want to reveal the color. In essesnce you are "erasing" the black and white copy to show the color beneath it. If you look in your layers palette, you'll see your color photo and a white square that says "gradient map". When using adjustment layers, you will be "erasing" the white square by using a black paint brush.
 2. Create a gradient map on a new layer by clicking on "Layer>New Adjustment Layer>Gradient map>OK" Now, if you're little color squares are set with the black on top, your photo will turn black and white. If it looks like a negative, just click on the "Reverse" box and it should be fine. When your photo looks black and white click OK.
3. Now what you've done is simply put a black and white copy of your photo on top of the color one. All you will do now is choose a soft edge brush, set the opacity at about 20 - 30% and paint over the part of the photo where you want to reveal the color. In essesnce you are "erasing" the black and white copy to show the color beneath it. If you look in your layers palette, you'll see your color photo and a white square that says "gradient map". When using adjustment layers, you will be "erasing" the white square by using a black paint brush.
Okay, so choose the brush tool, choose the size, and set the opacity up at the top of your screen. Black should still be your foreground color. Move your mouse over the part of the photo you want to bring the color back on and (while holding down the mouse button) move the mouse around, painting back the color. Make sure you use a smaller brush around the edges if you want it to look precise. You can even use the zoom tool (the one that looks like the magnifying glass with the '+' on it) to get a closer view and be even more precise. I didn't bother because the edges of the tutu aren't very well defined. I just painted over and over until I like the result!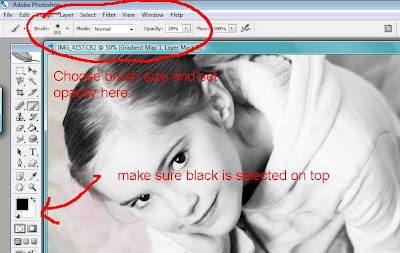
4. If you look over on your layers palette, you'll see black splotches where you have painted on your photo.
5. That's it! It is so simple! I hope you take the time to try this easy technique because you can have SO much fun with it. Let me know if you have any questions :)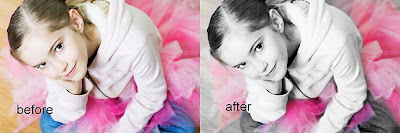
Oh - and I went a little shorter :)
4. If you look over on your layers palette, you'll see black splotches where you have painted on your photo.

5. That's it! It is so simple! I hope you take the time to try this easy technique because you can have SO much fun with it. Let me know if you have any questions :)


9 comments:
Thank you SO much! I actually want to do a photo like the one you used as an example. My baby in a green tutu..a tutu I made thanks to your helpful link. You're awesome.
And you're hair is super cute...I do hair and I'm all about the short styles!
Thanks again!
YaY! Love your hair! So cute it is.
I love this and have always wondered how to do it - I am going to try this!! Thanks for sharing! And, your hair looks great, the short look is YOU! *STAMPIN HUGS* Alex
your tutorials are the best!!! Thanks for sharing!
your hair looks so cute and thanks for the tutorial!
Talia:)
i LOVE YOUR NEW HAIR- VERY FLATTERING! aND I CAN'T WAIT TO TRY THIS! I HAVE BEEN WANTING TO KNOW HOW TO DO THIS FOREVER--- THANK YOU! BY THE WAY I DID THE CREAMY B&W AND IT IS SO PURE... I LOVE IT! THANK YOU!
As you know, Bobbi, I have 5.0 and I had just one thing that you don't mention here so I thought I'd bring it up just incase there are other looser 5.0 users. (ha ha) But when I started using my brush it didn't work and I had to play with the "mode" part of my brush. I had to put the mode in "DIFFERENCE" Mode for it to work. Very easy though! Fun too!
Oh my gosh, I just discovered your blog and I am in heaven. You are a Photoshop queen! Your tutorials are the best I've seen, truly, and your photography is amazing. Thank you!
Hi! I really wanted to learn to do this. I have Photoshop Elements 6 & I can't seem to get it to work for me. I don't have just a plain brush, I have a spot healing brush tool that I can use to put the color back in, but when I unclick my mouse, the color goes away. I can't get it to keep what I did. And,with that brush there is no option to change the opacity so my color I'm putting in isn't very "popping". Any additional tips for a PE6 user? Also, I noticed my big white box for the gradient layer stays white and doesn't show my progress like you mentioned. Thanks! Jill P.
Post a Comment