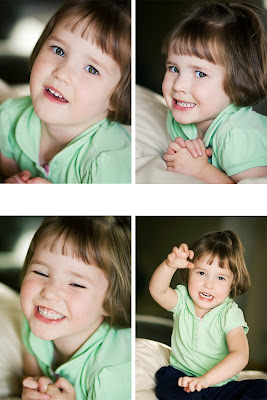
There may be another way to do it more easily, but since I don't really remember how to use PSE, I'm playing it by ear ;) For all you photoshop users, there is a neat way to make a contact sheet automatically - if you're interested in an explanation of how, let me know!
I've decided to start giving some VERY simple photoshop tutorials on my blog (seems good a place as any) because I get a lot of questions on how to do things. I think a lot of people are scared to ask because they don't want to sound stupid! But I truly believe that questions are the best way to learn (just ask my sister, who took my photography course at SAIT with me - ha!). I also believe that if you have the question - there are at least a few others who want to know the same thing but are too afraid to ask :)
I'm a nut when it comes to technology. My husband can attest that when I get something new, I immediately open the manual and read, read, read - until I understand exactly what I've got and all that it can do. I also search online for tutorials that help me better understand how to get more out of my product/software. But what I find, often, is that these manuals might as well be written in another language! Sheesh! That's why I hope these tutorials will help other regular moms like me ;)
What would make my job easier (narrowing down which tutorials to include) would be for you to let me know what you'd like to see here! You can leave a comment with a question, or email me (if you're to shy to ask on here). We are all in this together gals! (oops, and guys - if there are any out there who read this thing).
So, this tutorial is something very simple that I thought was kind of fun. It's a way to make coloring pages out of your photographs. I got this idea from the blog "Princess Pigbear" (see the sidebar) because she made a coloring book with photos of her daughter, for her first birthday. How fun! Anyhoo - this is how! (Using Photoshop CS2. I'm sure Photoshop Elements is similar, but you might need to look around a bit more to find the same things).
 First things first - opening a photo to work on! Like I said - no problem is too insignificant! What you want to do is open your photoshop program. When it's open, you will go to the upper left hand corner of the screen, click on "File" - then click on "Open". An easy shortcut for this is to just click Ctrl+O. Then this screen will pop up:
 Now you need to find the photo you want to open. Often you will have filed your photos in "My Pictures" - I am, obviously, using a PC - sorry MAC users, wish I could help you more ;) Once you find your photo, double click on it and the photo will appear on your screen.
When editing a photograph, the first thing I always do, is duplicate the image. This is so you are working on a copy and not the original image. This will save you if you make some mistakes that are irreparable. This is really easy to do! You go to the top left hand side of the screen and click on "Image". Then scroll down to "Duplicate". Click on that. When you do, you will see TWO copies of your photograph on the screen. What I then do, is close the original. Now you can fool around with this copy and not worry! The original is safe and sound :)
 Now for the fun of making a coloring page. EASY folks!! Okay - go up to the top of the page, and click on "Filter". Scroll down to where it says "Sketch" and click, then click on "Photocopy".
 When you click on "photocopy" this screen will pop up. If you can't see your whole photo in the little screen to the left, just look right under your photo and you'll see a place where you can adjust a slider. There will be a little + and - sign. Just click on the "-" until you can see the whole photo.
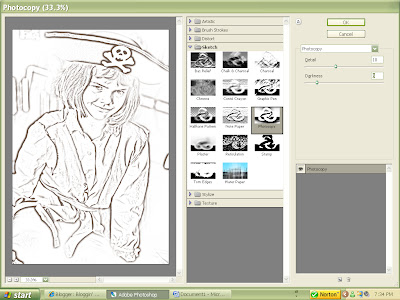 Now all you want to do is adjust the sliders under "Detail" and "darkness" until you get good outlines and less detail. Here I used a detail setting of "10" and a darkness setting of "8". Just play until you like the effect. We will darken the lines later, so just be sure that you've got a decent outline and have gotten rid of some of the tiny details. When you are done with this step, just click "OK"
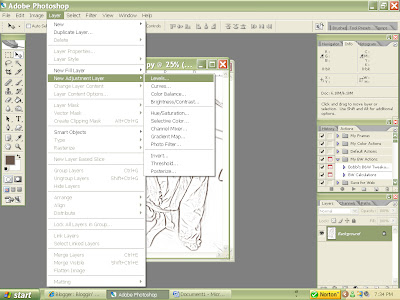 Now you are going to darken the outlines and get rid of some of the "grainy" details. So, click on the top of the screen on "Layer". Then click on "New Adjustment Layer" and then on "Levels". A little screen will pop up - just push "OK". Now you will see a little screen labeled "Levels" that will look like this:
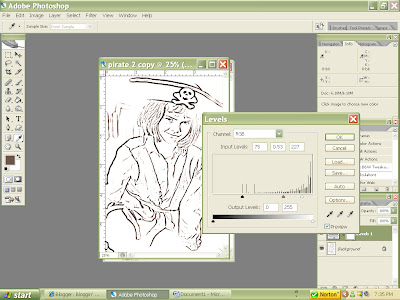 What you want to do is adjust those little sliders (the black, the gray, and the white) to your liking. I usually slide the black one over to the right - it makes the black in the photo darker. Then I slide the white one over to the left a little to get rid of the graininess. You can leave the gray one, or slide it around a bit until you like the effect. When you are done, click "OK".
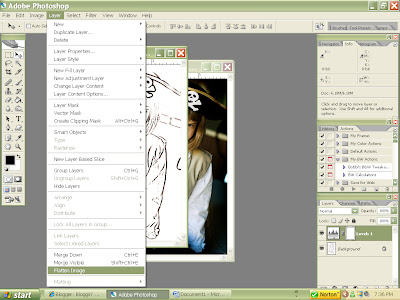 Now you are almost done! If you look to the right of the screen, you can see a little tab with the word "Layers" on it. You will notice that you have a background layer, and a "Levels" layer. You will want to only have ONE layer if you are going to print a file. So, that means you need to "flatten" your image. That's almost like you're gluing all the layers together (if you were paper crafting :P) To flatten the image, you go to the top of the screen, click on "Layer" then scroll down to the bottom and click on "Flatten Image". Once you've done that, you are ready to save! Just click on "File" then "Save" and save your image under whatever name you like. Now you can print out your fun coloring page on your printer at home! Yippee!
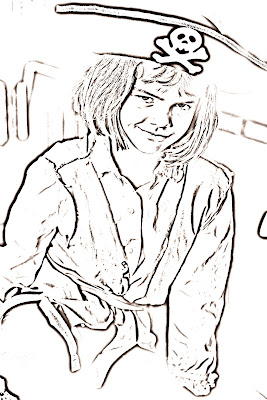
Hope that was easy enough to understand. If you want to make things complicated, you can save the image as a certain size (like 8.5X11) but all I do is when I send the image to print, I choose a "full page" print and it prints to the size of the page. Your kids will get a kick out of coloring a page of themselves, and it would be a fun activity at a wedding to keep young kids busy! Please leave comments - I want to know what you are interested in learning - everything from editing photos, to digital scrapbooking! I wanna hear from yoU!

8 comments:
Very good explination! I'm going to do this for my kids today! What a fun idea. Thank you!
I so want to learn digital scrapping! I have Photoshop 3.0, but really don't know how to use it. What a waste, huh?
I tried your coloring page. The instructions were very easy to follow. The only problem I had was my picture was side ways ( I guess I should have turned it at the beginning) then when it went from picture to coloring picture it was too big to see the whole picture and I didn't know how to make it smaller. But all in all it is a great way to learn new things. I have a note book that I keep and every time I learn something new I put it in there with the instructions so it is always at my finger tips. It is especialy nice if you don't use it alot and don't always remember the steps I just check my book. It's great. Keep up the great work bobbi and can't wait for your next lesson.
sorry bobbi
I went back and read the instructions again and seen how you had said to make it smaller. oops
when I did it this time my picture wasn't side ways. So I don't know what I did wrong the first time. I guess I better learn to read instructions a little better.
Thanks! Great idea!
I have pse, but I am sure you can help- how do I get the photos sized up so I can print out a 4x6, but it will have say, 6 smaller pictures on it. does that make sense? thanks!
Hmm...Good question, Kristi. I know how I would do it in Photoshop (there is a tool that will create a contact sheet the size of your choice, so it makes it easy). Maybe one way would be to create a new 4X6 file (File > New), then drag and drop your photos onto it, rotating to fit best, then flatten and save. You should then be able to order (or print from your printer) the print as a 4X6, but it will have all your smaller photos on it. Make sense?
Okay so I must be doing something wrong I tried this the other day when you posted it and it went blue. I figured I was toooo tired to be experimenting, so I came back to doing this again today and when I go to photocopy step it is blue and black! I can adjust the black to darken like you said but I can't get the blue to go white. Any thoughts?
Post a Comment