1. I almost always shoot in RAW, mostly to save my butt with the exposure and giving me more creative control. I open Photoshop first, then go to file>open to choose which image I'll open. Sometimes I'll even open several at a time. But for this example, I'm only working on one image. When I open it, this Camera RAW screen pops up.
On this screen I will tweak the exposure and the temperature of the photo (making it warmer or cooler if needed). I may also fiddle with the contrast, shadows, etc. if I see the need. This photo didn't need much tweaking there. So I clicked "Open Image".
2. Once I click on Open Image, the image pops up in Photoshop. At this point I like to adjust the color a bit further using "Color Balance". Just to make sure the skin tones are just where they should be.
3. Once I'm sure the color is picture perfect, I like to zoom in and do some close-up edits with the patch tool, or the spot healing tool. I remove blemishes to even out the skin tone. I do this on a new layer so that I can adjust the opacity to my liking. In this picture, below, I didn't show the new layer for some reason.
4. Since I'm zoomed in, I use my eye pop tool to really bring out those eyes. If needed, I also use my smooth skin action - though that wasn't needed in this particular photo.
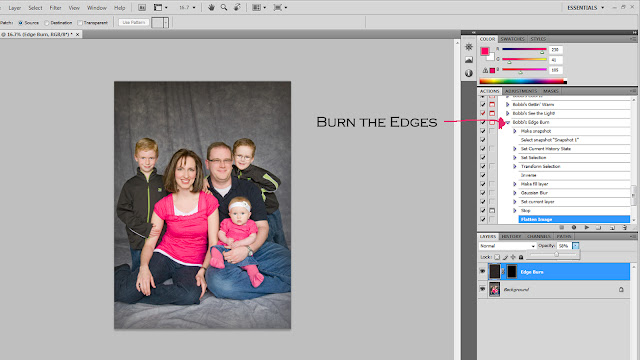
5. Once all of the close up edits are done, I zoom back out to see the whole photo. I use my "Bobbi's Edge Burn" action to burn the edges, or if it's another photo, I might use an edge fade, or no edge work at all! It's my creative choice. At this stage I might also run a color pop action, or any other creative action I think it needs. For this photo, the colors popped enough for my liking, so I left it alone. At this point you can crop the photo, as well.

6. The final step - always the LAST step - is sharpening. If the photo needs it, I might run Bobbi's REALLY sharp, then my regular sharpening action. You have to make that call yourself depending on the photo. BUT, ALWAYS just sharpen LAST.
So, in a few short steps (even made shorter using actions) I can get this photo ready! Hope that helps!


4 comments:
I assume that once you have finished editing you save it as a raw file and then a jpeg as well for the client. Is this correct?
Thank you very much for sharing this tutorial. I also like to use RAW photos but I've never been able to get my photos to look as awesome as you do yours. I *love* the clarity and the way that you always make the eyes looks so beautiful. Do you have any of your actions for those of us who use PSE? I use PSE 7. Thanks Bobbi.
Mary
Hey Bobbi Jo as always your work inspires me!
wondering, do you ever use "lightroom" to edit? I find it works great, and hard use PS since getting it!
Just a thought!
If you have time come have a peek at what I have been working on!
www.mysoulphotography.blogspot.com
smiles
Laura
thanks for sharing this tutorial! I never thought to a layer for the blemish removals!! thanks for the tip! hugs from conroe, tx!
Post a Comment