
For today we are going to learn a really fun technique that can be used for blog headers, digi scrapbooking, or just giving your photo more DRAMA!! Yes, drama can be a GOOD thing :) I have used this technique for my photography website and it worked well. I used PSE 5.0 for this tutorial, but it works the same in most versions.
Here we go:
1. Open the photo you want to use. Before we move on, we need to change that photo into a layer, not a background. To do this, we will double click on the little padlock symbol beside the photo on the background layer (where the arrow is pointing). When you do that, a little screen will pop up and you can name your layer, or just leave the default name. Click OK.

2. Now you will click on the crop tool (the one I have circled) on your tools palette. Once you click on it, you will see some boxes appear at the top of the screen. Click on the little drop-drown menu beside ``Aspect Ratio`` and choose ``No Restriction``.

3. Move your mouse to the upper right hand corner, and click and drag towards the bottom left hand corner so the entire photo is selected. Do not click on the check mark yet!

4. Click on the middle square on the left hand side of your photo and drag it farther towards the left to add some space to the lefthand side of your photo. Click on the checkmark.

5. Now you will see some added space to the left of your photo. Nice!

6. You will create a new layer by clicking on the little dog-eared square above the layers palette. 

7. You need to change your foreground color to black and your background color to white (if you are doing a fade to black - inverse if you are fading to white instead). You can do this by clicking once on the itty bitty black and white squares.

8. Click on the gradient map tool on your tools palette. It`s the one that looks like a fading color rectangle. When you click on that you will see a rectangle pop up at the top of the screen. You will need to double click on that rectangle. 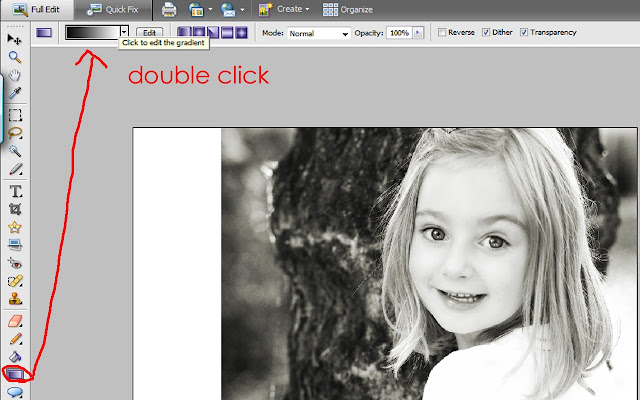

9. A box will pop up. You will need to click on the square I circled, which will change your gradient to foreground to transparent. This will allow your photo to show through. Click OK. 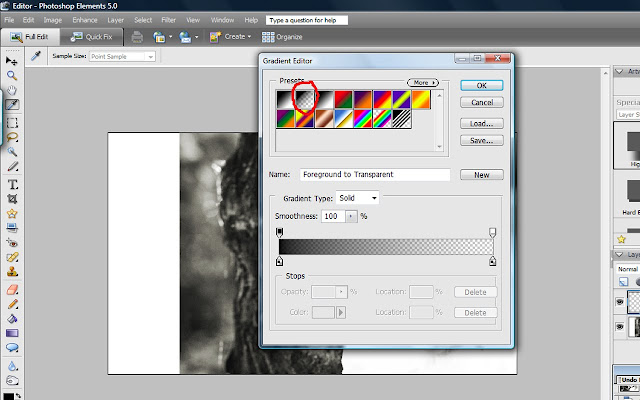

10. Okay, this part is a bit tricky to explain, I hope you can see on the photo below. You need to click your mouse just inside the edge of the photo to the left, and drag it towards the right as far as you want the gradient to reach. When you let up on the mouse, it will create your fade to black (or white). If it isn`t far enough over, you can always undo and redo the gradient until you get the effect you like.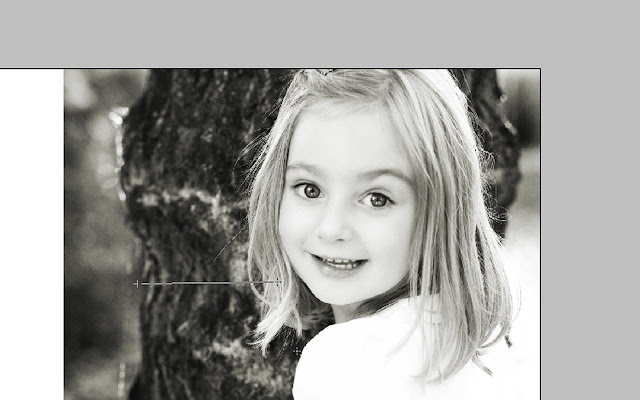

Done! So fun! You can even choose different colors instead of black or white. Have fun with it! 


3 comments:
T still learn so much from you! Thanks for posting this bobbi : )
I just wanted to say thanks for sharing your photoshop tricks and tips. You have given me so many ideas to work with and try and improved my finish photos dramatically! Thank you for being kind and generous with your talents!
This one looks fun to try. Thanks Bobbi
Post a Comment