Thanks for your fabulous comments! It was a birthday wish come true! Now I don't feel as old as I thought :) I woke up this morning and I was still me, maybe with one or two extra wrinkles. LOL! I really love hearing from all of you, my good blog buddies! Thanks again!
Now, I've been promising a fun new Photoshop tutorial that I've recently fell in love with, and I'm going to share it with you. It's a wonderful skin smoothing technique that give your subject that "supermodel" smooth skin while keeping the edges sharp. This is great for skin tones that are slightly uneven, or maybe have some small blemishes, or just any photo you want to add that "glam" touch to!
Now, this is a technique that will require the use of layer masks, so don't run away at the sight! These layer masks are SO useful in adding a technique to only certain parts of a photo. Stick with me and you'll have a lot of fun with this technique.
1. Open a photo of a person - a fairly close up photo works best for this. Remove any major blemishes with the healing brush tool or however you usually do it. When you're photo is almost ready to save, do this technique.
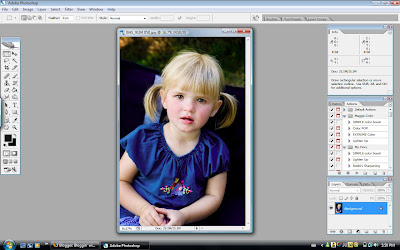
2. Duplicate the photo layer by clicking on Layer>Duplicate Layer OR just click on the thumbnail of your photo on your layers palette and drag it onto the "create a new layer" icon to the bottom right. What you will see is a duplicate of your image on your layers palette. You can name this layer "Smooth Skin" if you'd like.
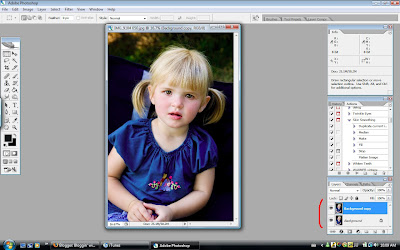 3. Now you will add the Median filter which will smooth and kind of blur the entire photo. Don't worry about that - we'll be fixing it soon. So, click at the top of the screen on Filter>Noise>Median. You'll see a little screen pop up that looks like this:
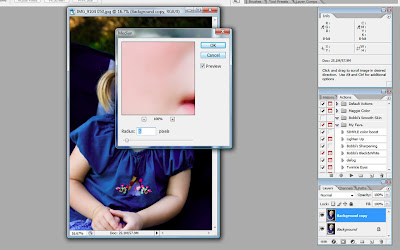
Where it says "Radius" enter a number between 5 and 10. I entered "6" here, and it's a good all around value to enter. The higher the number, the smoother the look. Click OK.
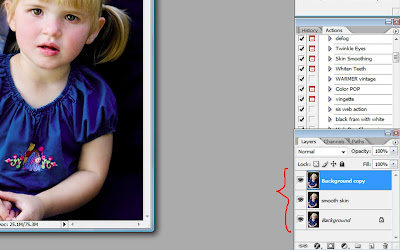
4. Now your photo will look smooth ALL OVER. We don't want that, right? We just want the skin to be smooth! So, there are a couple of things we can do here. I'm going to use a layer mask to cover the smooth effect, then erase back the skin parts so they are smooth and the rest is still sharp. Still with me? Okay, here is what you do. Create another duplicate of the background layer by clicking on the background thumbnail on your layers palette. It's the one on the bottom. Then repeat the steps in step 2. Layer>Duplicate layer. Now you'll have another layer called "Background copy" right above your background layer on your layers palette. Drag that copy to the top of your layers palette. So, now your layers will be in this order:
 5. Now we will add the layer mask. You do this by clicking on the little square with the white circle in the center at the bottom of the layers palette. If you have a version of elements that doesn't support layer masks, then you can skip this step and I'll explain what to do next.
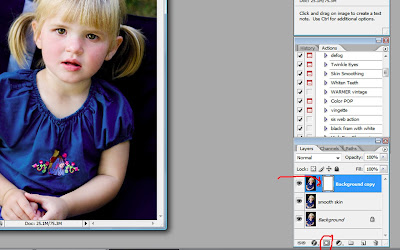
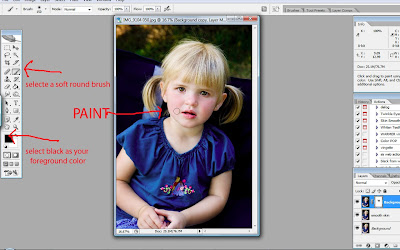
6. Select a soft round brush on your tools palette, then make black your foreground color. Now, you can paint over the skin on your photo and watch as it magically becomes smooth! Be careful to avoid eyes, eyebrows, eyelashes, nostrils, hair etc. JUST do the skin. If you make a mistake, just change your foreground color to white and paint over the mistake.If the smoothing is too much, then just lower the opacity of the skin smoothing layer in your layers palette until you like how it looks. When you are happy with the results, you can flatten your image!
 Okay you Elements users - if your program doesn't offer or support layer masks, then you simply use your eraser tool to erase the top layer to reveal the smooth layer beneath. You need to be careful because if you make a mistake, you can't undo an eraser tool as easily. You can still adjust the opacity of the smooth skin layer to your liking. Flatten your image when you're done!

Make sense?
If it doesn't make sense, it's okay - I've created an action for it! Merry Christmas! You can download it here:
(3) Bobbi's Smooth Skin.atn
Elements users, you can try it out. If it doesn't work well in Elements, I may try to come up with one that works. It worked for me in Elements 5.0, you just have to flatten the image yourself. If you need a refresher on how to load actions into elements, check out this past tutorial HERE.
Merry Christmas everyone! I doubt I'll be back before Christmas. Love you!

3 comments:
Thank you so much!!
Merry Christmas to you and yours! :)
Thank you, thank you, thank you. Merry Christmas to you and your family.
This is the best tutorial! It worked great with Elements too!
I look 10 years younger. :)
Thanks!
Post a Comment