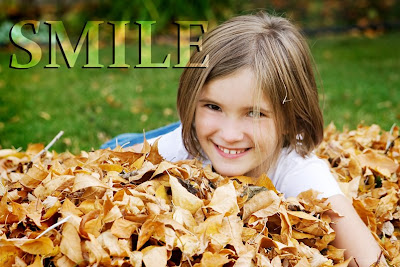
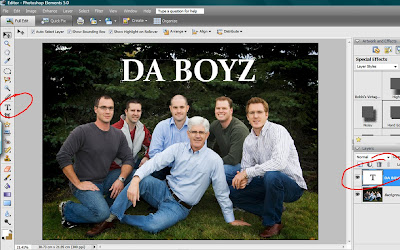
1. Open the photo you want to add your awesome title to (Ctrl+O or File>Open). When it's open, click on the Text tool in your tools palette and choose a thick font and a large font size.
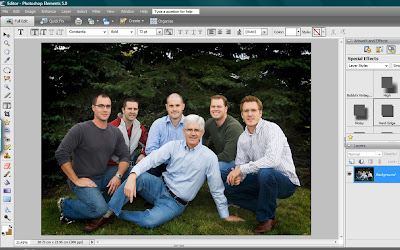 2. Type your title somewhere on a fairly uniform part of the photo. A lighter part probably works best, but since I only have a dark space, I'll do it there. Now you'll have a background layer and a text layer in your layers palette.
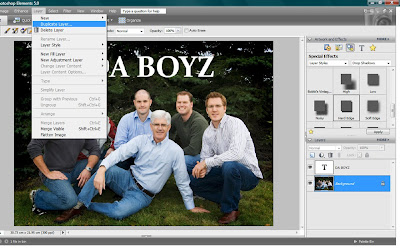
 3. Click on the background layer (the one that looks like your photo) in your layers palette, so it's highlighted. Now you want to duplicate that layer (Ctrl+J or Layer>Duplicate Layer). When the little screen pops up (only when you click Layer>Duplicate layer) click OK.
 4. Now you'll notice 2 layers that look like your photo and you'll still see the text layer there above them. Click on the "background copy" layer you just created and drag it above the text layer in your layers palette.
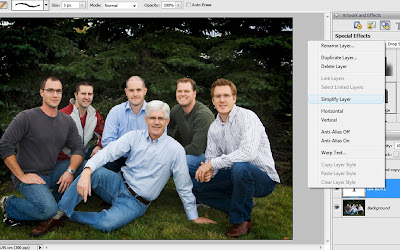
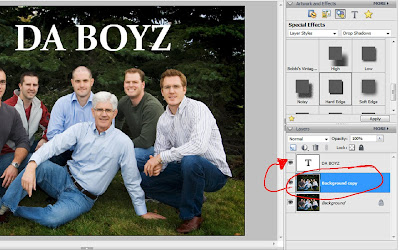 5. Now, click on your text layer so it's highlighted. Right click on your mouse and from the menu that pops up, click on "Simplify layer". By doing this, you will be changing the text layer into an image layer, sort of. Before you do this step - be sure your title is correct, that it looks just like it's supposed to because once you do this step you can't edit the text anymore.
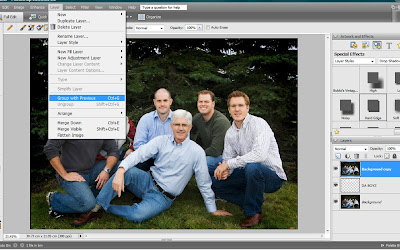
 6. Now we want to group your top background copy layer with the text layer. Click on the background copy layer so it's highlighted. Then click on Layer>Group with Previous. This will group the background copy with your text.
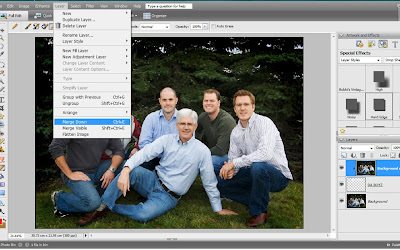
 7. Now we will merge those two layers. Click on Layer>Merge Down (or Ctrl+E). What will happen is you will now have only 2 layers in your layers palette, one will look like your picture, and the other will look like your title, only it will be filled with your photo.
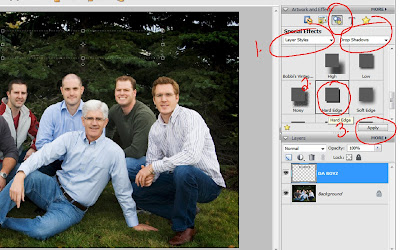
 8. Make sure your "text" layer is highlighted, then click on the "Special Effects" icon (the one with 3 circles), then choose "Layer Styles" and "Drop shadows" from the drop down menus, then choose the "Hard Edge" drop shadow from the menu. Click "Apply". This will add a drop shadow to your title and make it stand out from your background.
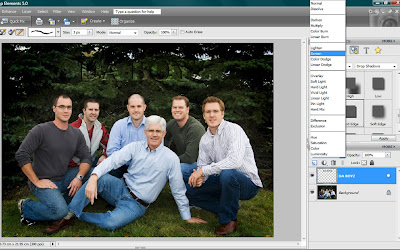
 9. If your title doesn't stand out enough yet, click on your title layer in your layers palette, then change the blending mode from "Normal" to "Screen" (remember how to do this?) All you need to do is duplicate the text layer (Ctrl+J) until the title stands out enough. Flatten the image and you're done!


4 comments:
I love tutorials! Just when I think I can't possibly learn anything else, another tutorial comes along. Thanks so much for this.
I love your tutorials too! We missed you!!!!!
You were the Runner Up Tutorial of the Week at Card of the Week.com. You can see the original post here.
I did use a picture from your post, with links back to the site and the original post. I hope that is OK. Please feel free to email me if you need me to change anything.
I also have an “I was featured” on badge for you if you want it :D
Thanks again for sharing!
Thanks Bobbi! I looked through your old tutorials, I didn't see this so I'm going to ask if you've ever done one for eyeglasses glare removal??
I love your blog and i learn a lot from your tutorials. Hope you can come up with more tips. Thanks a lot for sharing!
Post a Comment