1. After you open your photo you will create a new Levels Adjustment layer. This puts a levels layer on top of your photo in your layers pallette. This can be done by clicking on the little half black/half white circle in your layers palette and clicking where it says "Levels", or by clicking on Layer>New Adjustment Layer>Levels.
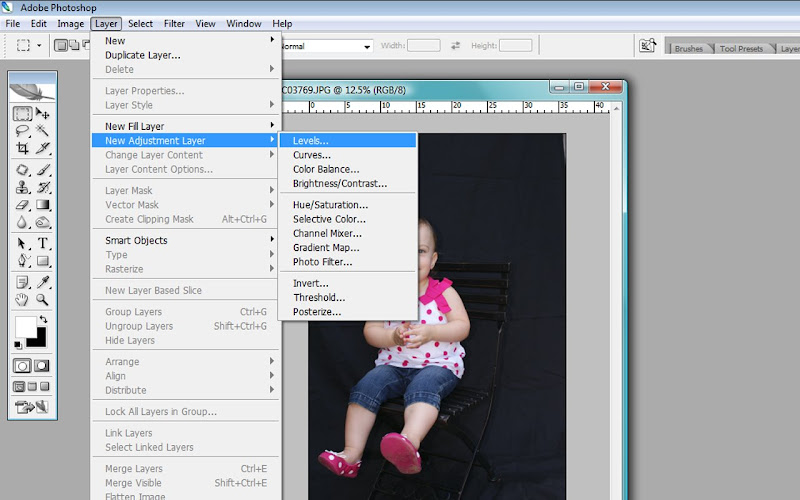 2. A little screen will pop up and you'll see (on the lower right hand corner) 3 eye droppers, one black, one white, and one gray. Click on the black one. This will turn anything you click on to true black. So now you have to click on a spot on your photo you want to be true black. The trick here, is clicking on the lightest part of the black backdrop (if you look closely at your photo, you'll see maybe some folds or spots on the backdrop where it is highlighted, or lighter black, than the others. This is where you want to click. I hope that makes sense.
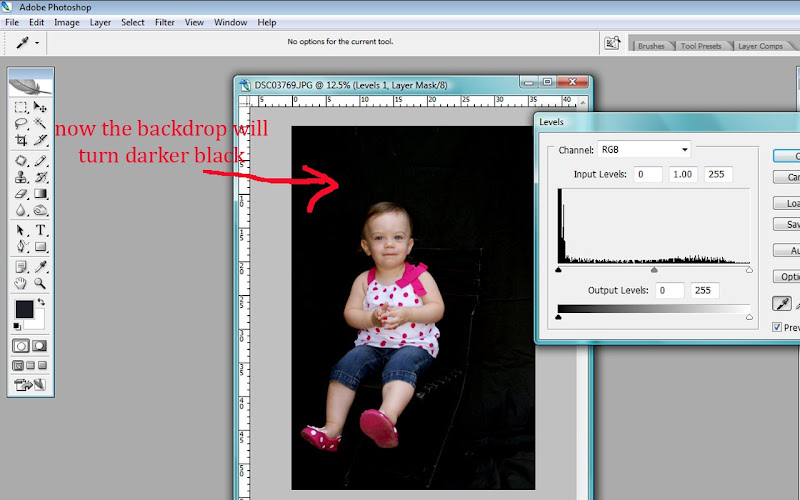
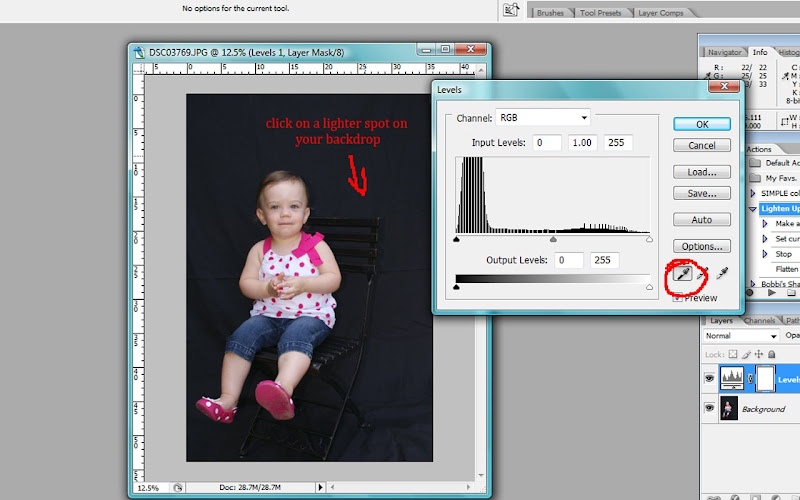 3. Once you click, you'll see that your entire backdrop becomes pitch black. If you notice some spots on the backdrop that are still more gray, than black, click on the lightest spots again until the entire backdrop is black. Your subject will also become much darker as well, but we'll fix that in a second. When you are happy with your backdrop, click OK.
 4. Now we don't want our subject being darkened, just the backdrop, so here is where the adjustment layer we created earlier comes in handy. Because the darkening we just did is on it's own layer ABOVE our photo, we can now carefully paint back our subject to it's original state. How do you do this? First, change your foreground color to black (remember those two little squares of color on your tools palette?). Make sure the black square is on top. Next. Click on your brush tool (i.e. the one that looks like a brush). Up at the top of the screen, make your brush a size where you can carefully paint over your subject - this size can change depending on how large your subject is. For me , I selected "200 px" for my brush size (it says "Master Diameter, but it means the size of your brush), I made sure the "Hardness" was set to 0% so my brush would have soft edges, and I set my Opacity to 50%.
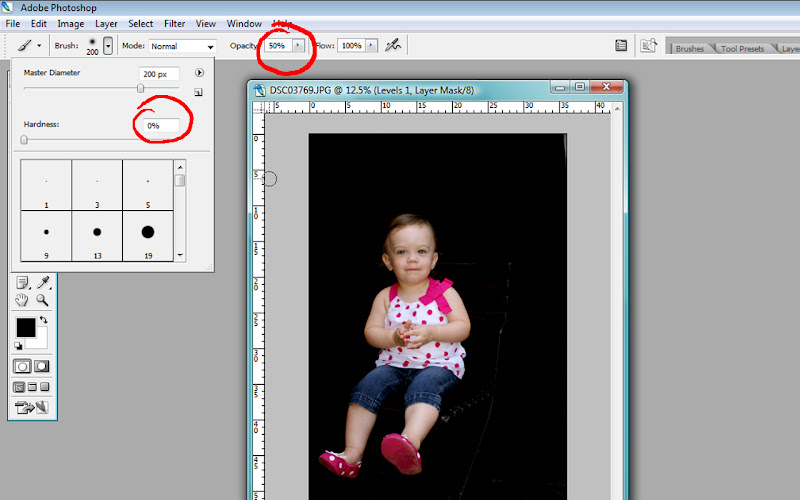 Once you have your brush settings, simply move your brush over your subject, and while holding the mouse button down, paint your original subject back in. This means you should be keeping your true black backdrop while revealing your original subject back. Keep painting over and over until you like the result. If you accidentally paint your black backdrop, just change your foreground color back to white and paint over the spots on the backdrop you lightened.
Tip: What happens when someone wears a mask? Basically, everything behind the mask is not visible and everything else is visible. That’s basically how Layer masks work except that you choose where the mask is and how opaque it is. When you are working with a layer mask, basically the mask covers the layer beneath it. In this case, the Levels Adjustment Layer is over the original photo. You'll notice that the Levels Layer has a white box. Anything the white is covering is the dark levels. How do you reveal the layer beneath? Just paint black over top. This could be like cutting holes in the mask to show what's beneath. How do you cover it back up? Paint white! Hope that made sense.
BEFORE:
 AFTER:

3 comments:
Love this - thanks so much for posting it! I have a question, it's kind of dumb, but do you take your sheet with you when you go to take photos? Doesn't it get all wrinkled? I guess this trick fixes that because then you can't see fold lines. Otherwise, do you iron your sheet backdrops? Thanks!!
Thanks so much Bobbi-I appreciate you explaining the paintbrush detail in more depth that is where I was losing it. Thanks again.
Cool thanks, I was wondering if you could do a quick tutorial on how to use digital embellisments and then add to photo without keeping white background, I m sure it easy but I am still learning PS. Thanks.
Post a Comment