
1. Open the image you want to select part of (File>Open).
2. Since I wanted to add my image to a 4X6 blank document, I created a new document (File>New>Blank File) and entered in the dimensions of Width 4 inches, Height 6 inches, 300 dpi. At this point, just create a file the size you want to work on, or if you want to drag part of the picture onto a photo or something, open that. If you don't get what I mean here, just email me and I'll try to explain.
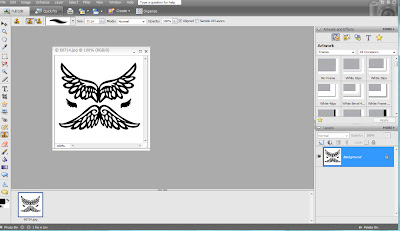
 3. Now, click on the top bar of the image you want to drag part of, in this case the wings (the top of the box where the wings are). I do this to make sure that THIS is the box I will be working on right now. Then I will select the magnetic Lasso tool from my tools palette. This is the one that has a little magnet beside it. I'm using this one because the picture of the wings is high contrast, and the magnetic lasso tool basically selects as you lightly drag your mouse around the object, automatically clinging to the darkest (or lightest) color. If you are more comfortable using the regular selection tools, go ahead and click on one of the others.
 4. Move your mouse over the image to a point on the image you want to start tracing around. You will be tracing around the image you want to move. Click once on the mouse on any spot around the edge of the image you want to trace - in my case, the top set of wings. Let up on the mouse button and slowly move your mouse around the object. The magnetic tool will automatically cling to to contrasting edge as you move your mouse slowly. I like to click here and there to anchor it. When you reach your starting point, click on the little square which is where you first clicked and you should now have little marching ants around your image. (not real marching ants. That's just what I call the dotted lines). See below. If you don't like how it selected your image, just do not select the check mark and try it again.
 5. Now we are going to move the image (drag it) over to the 4X6 document I created. To do this, you will need to select the "move" tool from the tools palette (yes I wrote"Select" tool on the example, but it's called the move tool - I've been sick with a head cold, and it's affecting my brain. LOL!
 This is where the photo didn't upload properly, so I'll explain what to do now. When you click on the move tool, it will put little boxes on the corners of your image, and a circle on the center. (like above). Make sure as you are looking at your screen, you can see the document you will be dragging your image on to. Notice how the top bar of the box with my "wings" on it is white - and the blank document is gray - make sure that yours is the same at this point - otherwise you won't be able to drag the image. You need to be sure that the one with the image is the one you have selected (active). Okay, move your mouse near the little circle in the middle of the selected image. Click your mouse down and WHILE HOLDING the button, move your mouse over to the blank document. Release the mouse button. You should now have a copy of your image on the blank document. It might look larger or smaller (depending on the resolution difference between the image and your blank document). No worries! You will resize it in the next step. At this point (if it worked) you can close the original image. Do not save the changes.

Since I wanted my wings larger, I resized the image by clicking on one of the corner squares and dragging it outward until it was the size I wanted. Then I clicked on the green check mark. Flatten the image and your done!
 Voila! ONE set of wings. I printed the 4X6 document on a 4X6 piece of transparency paper and cut them out to add to my project!
I LOVE LOVE LOVE this project. The minute I saw it on their Girls Night Out blog, I knew I had to copy it. I found the felt chandeliers at Michael's for $1 (so I bought about 6!) and I had the beads etc. here already. So cute. I hope the tutorial helped, and as always - if something isn't working please email and I'll try to walk you through it!
4 comments:
Sweet I actually needed to know this for my own little project just today-- good timing!
Thank you Bobbi. I love these tutorials. They are great! Thank you for taking the time to do them.
Oh- and I love your finished craft! Very cute.
Ooohh...it looks so cute!!
What a great project! I am seriously soooo jealous that you finished that many pages! I have so much catching up to do, but no energy to do it. I think I just need to pull an all nighter and pay for it the next day!
Post a Comment