

Inspired by Rebecca Cooper, and by a need for more magnets to hang artwork, etc. I decided it would be fun to create personalized magnets for each member of the family. The kids love having a magnet with their own photo to hang their latest masterpeices on the fridge, and I love seeing my own artwork HOLDING their artwork - LOL! I did this tutorial using photoshop elements 5.0, but the same principles apply when using full-version photoshop as well. Here we go!
1. You will first create a new file (File>New>Blank File) and enter in the dimensions you want your magnet to be. Since I used a pack of thick business card magnets from Staples, I want my magnets to be the same size as a standard business card, which is 2"X3.5". So those are the numbers I enter in the spaces provided, like so:

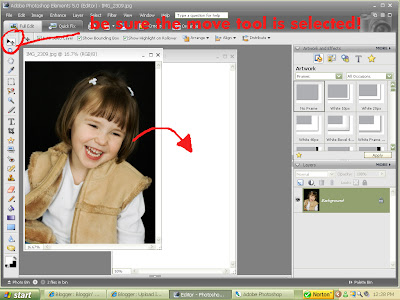
2. Now open your desired photo (File>Open) and it will appear next to your white canvas for your magnet. Be sure the move tool is selected and drag and drop your photo on to your blank canvas. The photo will be much too big for the canvas - that's okay, we'll fix that later.

3. To make seeing it easier as you resize the photo to fit, first maximize the window by clicking on the square box in the upper right hand corner of the magnet canvas.
 4. Now you want to free transform the photo so it will fit inside the white background better. You can selec "Free Transform" by clicking on "Image>Transform>Free Transform" or by simply clicking on the shortcut "Ctrl+T". This will put little boxes on the corners and sides of your photo, making it ready to resize.
 5. Click on one of the boxes in the corner and drag it inward to resize the photo until it fits over the white background. The photo will still be a little bigger than the background on the sides because business cards are skinnier than standard photo, but make it fit as best as you can without the background showing through.
 6. You could stop at this point, print it out and adhere it to the magnet as is. If you want to add a strip with the child's name, continue on with these steps. Create a new layer by clicking on "Layer>New>Layer"
 7. Now you will create a rectangle over the photo (a strip, really, where you'll write the name eventually). Click on the shape tool, and select the rectangle shape. Also choose the color you want your strip to be. I kept mine red (it was easiest) but you can click on the box and choose whatever color you like, even a color from the photo!
 8. Now drag out a rectangle across the part of the photo you want the name to go.
9. I want my rectangle to be slightly see-through, so I'm going to change the opacity to 50% over in the layers pallette. All this is doing is making the rectangle layer 50% more see-through, allowing the photo to show through more. You can change the opacity to whatever you like.
 10. Change the color box to white, choose the text tool, position your mouse on the spot on the rectangle you want to type and type the child's name. Remember to click on the check mark when you are done with each step, if you are in elements. Just flatten the image, save, and you're done!

11 comments:
I can't wait to do this! How do you adhere the printed photos to the magnets? Do you print at home or send them out? What about your digi scrapbook pages? (just curious)
I would also love a tutorial on coverting a photo to that creamy black and white, (not sepia) I have PSE 5 so I can't get your boosts:(
Thanks for your awesome work!
This is a great idea! I love it.
Oh these are SO CUTE!! What a great idea!! Thanks for sharing!
Once again you amaze me!
Amy - I bought a pack of magnets from Staples that are already sticky on one side. I printed them on the computer and stuck 'em right on! You could probably order them (maybe group them onto a 4X6 canvas) and then they would be glossy. Whatever you like!
I print my 12X12 digital pages at Costco. In photoshop I create a 12X18 canvas, drag and drop my 12X12 page onto it. In the space left at the bottom, I put 2 6X6 layouts for my kids to have their own album. I think the prints are less than $3.00, and I get 3 layouts printed for that. They do a great job, too. My friend, Michelle, pointed it out to me.
I'll try to get a step-by-step tutorial in Elements that duplicates the creamy black and white look soon. I've got a bit of experimenting to do ;)
Awesome and Cute idea!!! What have you got on your fridge with your own magnet holding it up? : D Curious!
♥ Your tutorial is so easy to follow! Thanks so much. I'm photoshop impared! :)
Sweet!! Off to buy some magnets!
I love your tutorials! So fun...thanks!
These are VERY cute...love them!!
Thanks again for a great tutorial! I've been eying this one for awhile and finally got around to it. I am making them for mothers day :) It was super FUN!!
Post a Comment