

I had a request to do a tutorial on how to get the "creamy" black and white conversions using photoshop elements. Since most (if not all) versions of elements do not contain "Curves" which is how I always edit my black and white photos, I tried to come up with a way to acheive basically the same effect using "Levels". You can try it - play around with the settings, and see how you like it! Okay, let's get started:
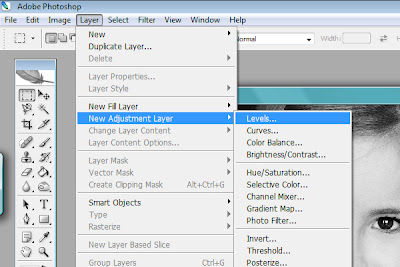
1. Open the photo you want to convert to black and white (File>Open). Remember to Duplicate the image (Image>Duplicate) and close the original. You don't want to permanently mess with the original file :)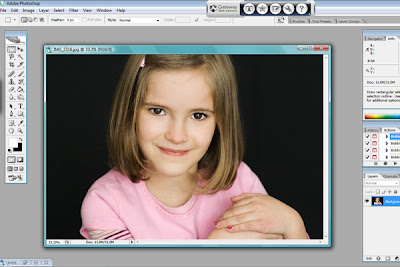 2. At this point there are a few ways to convert your photo to black and white. I am going to do it using a gradient map. So, reset your color squares to black and white (those 2 little boxes in the lower left hand side of the screen) before you do this step or the colors will be wonky. Go to Layer>New Adjustment Layer>Gradient Map
 2. At this point there are a few ways to convert your photo to black and white. I am going to do it using a gradient map. So, reset your color squares to black and white (those 2 little boxes in the lower left hand side of the screen) before you do this step or the colors will be wonky. Go to Layer>New Adjustment Layer>Gradient Map
 3. Alright, your photo will turn black and white at this point. If your photo looks like a negative, just click on the little square that says "reverse" on the screen that pops up for your gradient map. Click OK when your photo is black and white. Flatten your image (Layer>Flatten Image)
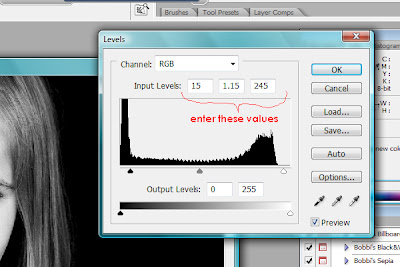
4. This is the point where I would use Curves, but assuming you don't have the Curves application, we will try to do the same thing with Levels. Basically we want to make the whites whiter, and the blacks blacker (I guess). So, go to Layer>New Adjustment Layer>Levels)
 5. When the little screen pops up, enter the values shown below (to start). If you like the effect, leave it, otherwise simply click on the little black, gray, or white arrows and drag them back or forward to get different effects. This is where personal taste will come in. I usually drag the white arrow to the left to make the highlights brighter, and drag the black arrow towards the right to darken the shadows a bit. Doing this is making your photo more contrasty instead of "muddy" grays. Click OK when you're happy with it. Flatten your image.
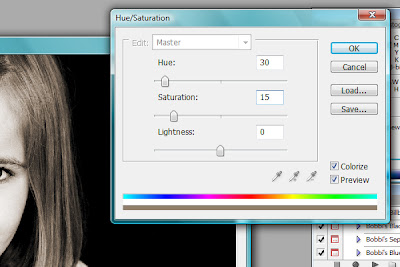
 6. Here is the trick to giving your black and white photos that warm, creamy tone. You want to go to Layer>New Adjustment Layer>Hue/Saturation (by the way, if you want to save time, you can created a new adjustment layer by clickin on the little circle that is half white/half black below your layers pallete. So much faster). Okay, once your hue/saturation screen pops up, click on the box that says "Colorize" in the lower right hand corner. In the box beside "Hue" enter "30", Saturation, enter "15" (or again, play with the numbers until you get an effect you like). Hit OK when you're done. Flatten the image. Can you see how that warmed it up a bit, removing those blue undertones? If you like the bluer undertones, just skip this step.. but since I was asked how I do it.....
 7. You might be 100% satisfied by this point. If so, GREAT! You're done! For me, I like contrast, so if the photo isn't quite contrasty enough, I simply bump the contrast by going to Layer>New Adjustment Layer>Brightness/Contrast and setting the contrast to 2 or 3. Voila!
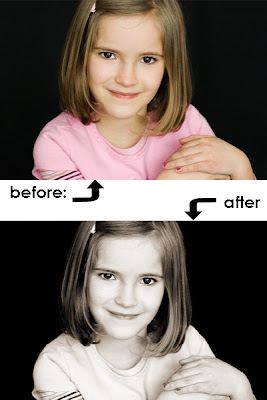
 And here is the final result. I really love using curves, as the end result seems smoother and you can fine tune the contrast much, much more. But this isn't too bad, right? I hope you get out there and try it now! Let me know how it works for ya.
 5. When the little screen pops up, enter the values shown below (to start). If you like the effect, leave it, otherwise simply click on the little black, gray, or white arrows and drag them back or forward to get different effects. This is where personal taste will come in. I usually drag the white arrow to the left to make the highlights brighter, and drag the black arrow towards the right to darken the shadows a bit. Doing this is making your photo more contrasty instead of "muddy" grays. Click OK when you're happy with it. Flatten your image.
 6. Here is the trick to giving your black and white photos that warm, creamy tone. You want to go to Layer>New Adjustment Layer>Hue/Saturation (by the way, if you want to save time, you can created a new adjustment layer by clickin on the little circle that is half white/half black below your layers pallete. So much faster). Okay, once your hue/saturation screen pops up, click on the box that says "Colorize" in the lower right hand corner. In the box beside "Hue" enter "30", Saturation, enter "15" (or again, play with the numbers until you get an effect you like). Hit OK when you're done. Flatten the image. Can you see how that warmed it up a bit, removing those blue undertones? If you like the bluer undertones, just skip this step.. but since I was asked how I do it.....
 7. You might be 100% satisfied by this point. If so, GREAT! You're done! For me, I like contrast, so if the photo isn't quite contrasty enough, I simply bump the contrast by going to Layer>New Adjustment Layer>Brightness/Contrast and setting the contrast to 2 or 3. Voila!
 And here is the final result. I really love using curves, as the end result seems smoother and you can fine tune the contrast much, much more. But this isn't too bad, right? I hope you get out there and try it now! Let me know how it works for ya.
7 comments:
Thank you! Thank you! Thank you! I can't say it enough! I have tried and not succeeded in my lame attempts to do this. I am going to follow this tutorial and email you my results. Thanks again! Horray!
♥ Once my computer is working right and I can load my photoshop back on. I'm doing this... Thanks so much
cool! i always like to learn new ways to do things in photoshop. thanks!!
Holy Moses - I wonder if I can do this??? I have photoshop but feel I know extremely little of what it is actually capable of! Thanks for this tutorial - I am going to play around and see what I come up with! *STAMPIN HUGS* Alex
I love your tutorials!! Thank you for doing an elements version! I absolutely LOVE this one!! =)
I just tried this and I love it!! Thanks.
Just came a cross your blog and I have already read a number of the tutorials. They are so easy to follow and are covering so many different aspects! Will be back for more! I'm trying to learn as much as I can as I slowly set up my little photography business.
Post a Comment