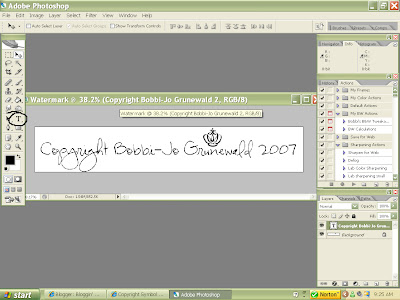
 Choose the width you would like your watermark to be - I chose 6 inches, so I can watermark a 4X6 photograph. I chose a height of 1 inch (a watermark doesn't have to be much larger). I chose a Background of White, and then I named the document "Watermark". Click "OK"
2. Now you can use the Type tool "T" to type whatever you would like your watermark to be. You can choose any font you like - Photoshop will have any font that is available on your computer - and you can even add a cute little symbol if you want. Be creative and have fun! This isn't much different than typing something in Word. Adjust the size of the font so the typing covers most of the space. Like so:

3. When you are happy with how your "watermark" looks, go to the top of the screen and click on "Select>All". This will put little "marching ants" around the entire image.
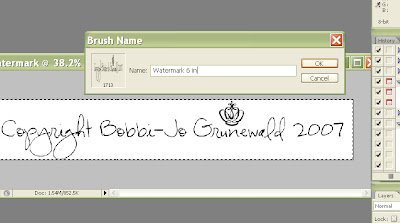
 4. Go to the top of the screen and click "Edit > Define Brush Preset" or in Elements, I think it's something like "Define Brush from Selection". When you click on that this screen will pop up:

You can name your watermark whatever you like - I named mine "Watermark - 6 in." so I know what size it is. Click "OK" and you're done! You've created your own watermark brush! Now the trick is, to use it!
5. Close your watermark document - you don't need to save it. And Open a photo that you want to watermark. Once your photo is on your screen, you will want to select the brush tool from the palatte on the left side of the screen. It looks like a paintbrush. If you can't see it, you'll need to click on the tiny arrow on the bottom right corner of the "pencil" symbol where there are different options - you should find the paintbrush there. Once your paintbrush tool is selected, go to the top of the screen. There will be a drop down menu ( a little arrow) right to the right beside the size of your brush. Click on that and you'll see this screen:
 Scroll to the bottom of your brush options, and you should find a nice little brush called "Watermark 6 in" or whatever you named your brush. Click on it. Now you will go to the top of the screen and create a New Layer "Layer > New Layer" (I'll explain why in a second).
Call this new layer "Watermark" and click "OK" :
 6. Now that you have a new layer to stamp your watermark on, you can go ahead and move your mouse over your photo. You should see an outline of your watermark. When you have it positioned over your photo the way you like it, go ahead and click. Remember to look at those little boxes of color on the bottom left side of the screen. Whichever box is on top, is the color your watermark will be. I chose white for mine. You can stop here and be done - OR you can adjust the opacity of the watermark layer (bottom left of the screen) to make it more transparent (you can see more of the photo through the watermark). You could also add a bevel/emboss, or a drop shadow (Layer > Layer style > Bevel/Emboss) to the watermark if you want as well - it's all what you like. This is the reason I had to create a new layer for the watermark - so you can resize it, add layer styles to it, and change the opacity - without it doing anything to your photograph.
When you are happy with how it looks - you can flatten the image and save it as a copy:
You never have to type anything on your photos - simply stamp this brush on every photo as you go. In fact, you COULD make a watermark action to do this to a lot of photos at once, but I'll leave that for another tutotial ;)
Please let me know if this helped you!

13 comments:
great instructions
can't believe I am learning all this stuff. I am so excited!!!!! I was beginning to think I would never be able to learn this.
Can't wait for the next one.
Thank you so much Bobbi!! As a mother of 4 and having your own photography business, i don't know where you find the time to do this!! I will try this later today!
Thanks! Loving the tutorials!
I did it! I am so excited. I am even more in love with your sight! This is fan-freakin'-tastic! Thanks Bobbi!
Yay, Jenn! I just checked out your site and saw your WAY cute watermark! See? Photoshop can be SO fun when you aren't afraid to play :)
So happy that you're trying things, too, Laurie! You really need to give yourself more credit, sis. You're a brilliant, fabulous, DIVA!
Fantastic tutorial.
Thank you for visiting my blog - gave me a chance to discover yours :)
Hey, I am so excited to learn this... but I DO have elements and I am not finding watermark anywhere. Under File, New, it doesn't bring up watermarks. Any ideas? Thanks a million!
Kathryn,
Thanks for asking - there isn't a document called "watermark", and I think I confused you because all I did is create a new document and NAMED it "watermark" when the new document screen pops up. Did that make sense? If I didn't rename it, it would have just been called "Untitled 1" or something like that. I hope it makes sense, and I hope you read this because I couldn't find an email address to get back to you. Good luck!
Thank you for this.... can you tell me how to make Photo Elements my default on my Mac Pro? Everything goes into Iphoto and I cannot figure out how to change!
I'm confused where you created a new layer: this is what is confusing me: 6. Now that you have a new layer to stamp your watermark on, you can go ahead and move your mouse over your photo. You should see an outline of your watermark. When you have it positioned over your photo the way you like it, go ahead and click. Remember to look at those little boxes of color on the bottom left side of the screen. Whichever box is on top, is the color your watermark will be. I chose white for mine. You can stop here and be done - OR you can adjust the opacity of the watermark layer (bottom left of the screen) to make it more transparent (you can see more of the photo through the watermark). You could also add a bevel/emboss, or a drop shadow (Layer > Layer style > Bevel/Emboss) to the watermark if you want as well - it's all what you like. This is the reason I had to create a new layer for the watermark - so you can resize it, add layer styles to it, and change the opacity - without it doing anything to your photograph.
I'm going to bed and than try this again tomorrow. But, if you can enlighten me more, I would appreciate it. Thank you.
Carolyn Smith
cmsmith46580@gmail.com
I completed a watermark for myself, but it has blue in it and I don't believe I selected any color. What am I doing to get that?
Carolyn
cmsmith46580@gmail.com
this was great...your a lifesaver
Geez, I can't believe I didn't now how to do this. I've been using the watermark tool in the process a ton of photos thingy, which is nice, except I was never really sure what size it would end up, had to pick the same damn corner for every photo and didn't know how people put in those little graphics!!! I know this tutorial is pretty old, but so is my copy of Elements. Thanks!!
Post a Comment