
I think it helps to think about digital scrapbooking as the same a paper scrapbooking. You'll be working with different papers, embellishments, photographs - placing them on your "page" in layers, only it's all digital! I also think it's important (at least in the beginning) to just DO the steps. Don't worry about HOW it works, just enjoy that it does ;)
The first thing you need to do before you get started is to download some digital kits. There are several sites out there who offer free kits for you to try out, and 2peas is one of them. Here is a link to their free kits to get you started: 2peas free kits Have fun! This is like shopping for paper and embellishments at a scrapbooking store!
Follow their download directions (usually you click on the picture of the kit you want, then click on the right side of the screen where it says "complete kit". A small screen will pop up - choose "Open" to unzip the file, or "Save" to save it and unzip it later) and save the files in a place in your computer that you can find them. I have mine saved in a file under "My Documents" - then my name, then "Digital Scrapbooking". You can save them wherever it will be easiest to find them later, maybe in "My Pictures". We will use these files a little later to make your page! But first things first...
1.Create a New Document
So, when you start a paper scrapbook page, you need to start with a blank page. You can decide what size you want to do (12X12, 8.5X11, 6X12 etc.) So, in the digital world, this is called "creating a New document" and here's how!
Create a new document that will be the layout. Go to File (top left hand side of the screen). then Click on "New". The "New Image" screen will open and it will look like this:

For the image size, choose Inches and make the layout whatever size you want to use. The sample is 12x12, but 8x10 or 8.5x11 are also popular sizes.
Under Resolution choose Pixels/inch, and 300. (At least 300 is necessary for high-quality printing. )
Under Background Contents, choose either a color (I use White when digitall scrapbooking), or check the Transparent box. Click OK.
*A neat trick to do now is to save these settings for use on future scrapbook layouts (so you don't have to keep entering all these numbers each time. Click "Save Preset" (on the right hand side of the screen) and give it a name (like 12X12 or whatever). Then choose that preset from the Preset: drop down menu next time!
Great! Now you've got a 12X12 square of "paper" on your screen. You are ready to choose a photo or two (or three - ha!) to scrapbook!
 2. Add a Photo
If you remember from the last tutorial, you choose a photo to use for the layout by going to "File" and then "Open" and then clicking on the photo(s) you want to use. When you click on the photo, the photo will open in its own window. It will look like this:
 Now you will want to move your photo on to your white background layer. To do, you need to choose the "Move Tool" from the top of the Toolbox on the left of the work area. This tool looks like this:
 Ok, now move your mouse over the photo, then - while holding down the left mouse button - click and "drag" your photo on to the white background layer. When you do - it will look like this:
You'll see that your photo window is still open, and now you've got the same photo on your white background paper. You can close the photo file now, if you want. Now - is your photo the size you want it? If not - you can resize your photo by hitting "Ctrl+T". There will be some little squares on the corners of the photo, and a circle in the center. To make your photo bigger or smaller, hold down the "Shift" key on your keyboard and click and drag a Corner Handle (one of the squares on the corner of the photo)to resize the photo to the desired size on the layout. You need to hold down the "shift" key while to do this to maintain the proper proportions, otherwise you'll skew the photo :) You can also move the photo around the page to wherever you want it by clicking on the circle in the center of the photo, and (while holding down the mouse button) dragging your photo around the page. When you are done resizing to whatever size you like, click on the check mark on the upper right hand side of the screen (I circled it). It will look something like this:
You can add as many photos as you'd like at this point. I'm going to stick with just one I think.
3. Add a drop shadow
This is a simple trick to make your digital images look more 3 dimensional. Click on "Layer" at the top of the screen, then click on "Layer Style" then on "Drop Shadow". This screen will pop up. You can adjust the settings to whatever you like - my settings here were: Opacity 50%, Distance: 10 px, Spread: 10, and size: 5. All these settings do is create a shadow around your photo to make it look as though it's lifted off the page a bit. You can do this same step with anything you add to the page.

4. Add Some "Digital Elements"
This is the fun part where you get to use your fabulous digital kits! Go to "File" (top left hand side of the screen) then "Open". A screen will pop up where you can browse to find your digital kit. Do you remember where you saved it? I'll be using the"Color My World" kit by Rhonna Farrer. You can find this kit here: Color My World

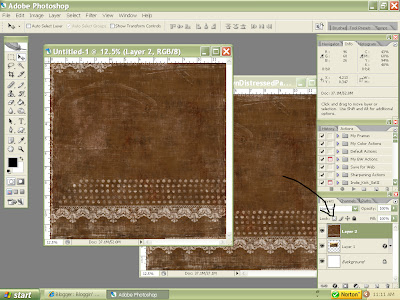
Now, click on whatever paper or embellishment you want to use. I clicked on the brown patterned paper to use on my page. It will open up in it's own winder, just like the photo did. Using the same steps as the photograph, drag and drop the paper onto the white background page. Now, you may see a problem! The brown paper is covering everything else! Look over to the far right of the screen. You'll see some little tabs that say things like "Layers" "Channels" and "Paths". Look at the "Layers" section, and you should see three "layers" - one will be a white background layer, one should be your photo, and the top one will be the paper you just added. These layers are just like if you were using real paper. If you slapped a large paper on top of your photo, it would cover it! You have to layer your photo on TOP of the brown paper. There are a couple of ways to do this. One way is to just click on the small photo of your brown paper layer on the right hand side of the screen, and holding down the mouse, drag it below to photograph layer.
The other way is to go to "Layer" (on the top of the screen) then to "Arrange" and you can send the brown paper to the back of the layers, bringing the photo to the front. Oh, and if for some reason, you can't see that little box with the layers in the bottom right of your screen - go to "Window" then to "Layers" - that should make that "layers" box appear.
 Once you've figured out how this works, you just keep repeating those steps to add more papers and elements. Remember you can resize anything by hitting Ctrl+T and using the "Move" tool to move your elements around the page. This is where you have fun and experiment!
5. Add a Title
Create a title using the Text Tool. Click the T icon in the Toolbox or type T. Use either black or white as a text color: Hit D on the keyboard to reset the colors to black and white. The current Foreground Color in the Toolbox will be the text color.
Click the Text Tool cursor on the layout wherever you'd like to start typing.
Type the title on the layout, then double click on it to highlight it to make any desired changes to the colors and settings. Only when the text is highlighted can changes be made. Using the various drop down menus, adjust the font, size, and typeface such as italic or bold. Highlight only certain letters to use various settings in the same text block. To use a larger size click in the size box and manually type in the size number.

okay - so now you've got your page the way you like it! I've added another photo - a few little embellishements, some journaling (following the same steps as the Title) and I've got all the layers in the right order. Now I'm ready to flatten and save. ONLY FLATTEN IF YOU ARE COMPLETELY HAPPY WITH YOUR LAYOUT! You will not be able to edit the layers or change anything once you flatten! You flatten the image by going to "Layer" and "Flatten Image". Notice that there is now only ONE layer labeled "Background". Now you are ready to save!!
6. Save
Save the layout by clicking "File" then "Save". A new box will pop up
Create a new folder in which to keep scrapbook layouts. Save in jpeg format to print. If you chose not to flatten because you want to work on it later, save as .png as this format saves all the layers in case the layout needs changes later. Choose a name for your file, then click "OK".
 Another screen will pop up. Make sure the quality setting is at "12" then click "OK". You're done! You can close your layout and it will be saved in the location you saved it. You can now print it from your printer or upload it to your blog or a site you want to order the print from! Fun! I know it gets complicated, but just go slow and try it! Experiment! you'll get the hang of it, I guarantee :) If you have questions, email me - or ask here. I'll explain new fun techniques in the future, but this just explains the basics of a digital page.
Here is the finished result: I did a second page to finish the spread. Happy Scrapping!


5 comments:
Oh, thanks so much for doing this Bobbi, the last tutorial too, I hope you do more, I'm sure they are time consuming, I just MAY have to try this! Hey, I heard Costco can print out these layouts, somewhere I read this, hope it's just not the States.
Love the layouts! YOU ROCK! but you know that :}
I love your blog...It's a big help.
I am excited to design my first digital page!!
THANK YOU
I could spend days looking at all of your wonderful tutorials, beautiful phots and your scrap pages. Thank you for taking the time to share all that you do. It is always such a joy to visit your blog.
Mary
Thanks for this tutorial. It is helpful. But I am also trying to figure out how people make the actual kits. How do they create those backgrounds and embellishments? Do they scan scrapbook papers into the computer as well as embellishments? I want to eventually make my own and I can't find tutorials on how to do this.
Thanks.
i reckon if i had you as my teacher/lecturer when i was at school or uni i would've been a straight A++ student and i would never have wanted to go home cos i'd want to devour all the knowledge you have.
thanks so much for your wonderful and detailed tutorials. explaining them in basic terms with lots of encouragement, a side of humour and screenshots/pix is my way of learning.
look forward to reading all your other tutorials you have on here already and future ones.
Post a Comment