2. Now you want to open the photo(s) that you want to make into wallet size. I want to do four of the same photo (in this case, the Valentine card) so I've opened it by clicking on File>Open, then browsing for the photo and double clicking on it so it opens up in photoshop - your screen will look like this. In this case, the original card was created as a 4X6.
3. In order to fit four of these onto my 4X6 white canvas, I'll need to resize my photo first so it will fit. I'm going to resize it to 2X3 so 4 of them will fit. Click on Image>Image Size and when this screen pops up enter the values of Width:2 inches, and Height 3 inches If you have "Constrain Proportions" checked (which you should) then you should only have to change one number. Now keep in mind that my photo is a portrait (ie. vertical) photo, so i will be making the height the 3 inches. If i were working on a landscape style (i.e. horizontal) photo, I would be making the width the 3 inches. Am I making sense? When you have the numbers put in, click OK.
4. Okay, now click on the move tool (the arrow in your tools palette) and drag and drop your photo (which now looks smaller) onto the white canvas. Make sure you are clicking on the actualy photo part and not the title or it won't let you drag it.
5. Close the original photo, and do not save the changes when it asks you.
6. Now I need to rotate my image around so it will fit best. My picture is now sized at 2X3 , so on a 4X6 canvas, I can fit 2 across and 2 down if I rotate them. Click on Ctrl+"T" and the little boxes will appear on the corners of the photo. Click on one of the photos and drag it around so it is sideways. Sidenote - if you went back to step 1 and changed the width to 4 and the height to 6, you wouldn't even have to rotate the photo, but I thought it would be a good idea to go over it anyway.
7. Now drag it to the upper left corner. If you are working with 4 different photos, just repeat the same steps above and rotate and move the 4 photos around until they are all in each of the four corners of the white canvas. I am making 4 copies of this one photo, so I'm going to click Ctrl+J which makes a copy of that photo right on top of the other one. Just click on the move tool and drag the new photo to another corner of the canvas.
8. Click Ctrl+J again and drag, then again and drag until you've got 4 copies of the photo in each corner filling up the canvas completely. If the photo you want isn't moving, always make sure 1. the move tool is selected and 2. you have the correct photo selected in the layers palette to the bottom right of the screen.
9. All you do now is flatten the image (Layer>Flatten Image) and save it!
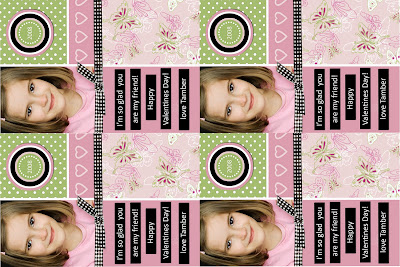
10. Now all you do it save it to a disc and bring it in to Wal-Mart and order a 4X 6 photo. You'll get one 4X6 photo back that looks like this:

...and you simply cut out the four photos at home. Just think of how fun it will be for the kids at school and at church to get a valentine with a photo of your child! It's something they will keep, or at least stick around for a while.
This technique is something that you will use once you get the hang of it. This should work almost exactly the same way in elements and full-version, so please give it a try. If you can do a storyboard, you can certainly do this! Good Luck everyone!


6 comments:
This is great - what program did you use?? *STAMPIN HUGS* Alex
I used photoshop CS2 - but the same steps can be used almost exactly with Elements and earlier verisons of photoshop.
Super dupah! Thanks for sharing Bobbi!
Neat little idea Bobbi! I love it. As a side note, you don't have to waste disks to take it into Walmart because you can submit it on line and they will email you when it is ready to pick it up. We have to print tons of pictures off and we find doing it that way is so much easier.
Now I wish I had some Valentines to make. C doesn't have many friends yet. ;)
B - I know, that's how I do it. I figured explaining how to upload on here would take too much time on an already LONG tutorial. LOL! I agree - uploading online is SO much easier. That's how I'm going to be ordering these little babies. I hope they turn out!
Doesn't WM cut off the edges of the photos. They do mine, whether I choose digital or not.
Post a Comment