
 Hi everyone! Welcome to Tutorial Tuesday! Yippee! As promised, here is a simple (yes, I meant it just stick with me) tutorial that should work the same with both Photoshop CS2 and Photoshop Elements. Storyboards are a fun and unique way to display your photos, and creating one is pretty easy. You can make a storyboard in any size you like, as long as you can print it (or have it printed at a lab). The size I'll be working on today is a 10X20" storyboard with 3 vertical 4X6 photos. Once you learn how to do this, you can create any configuration of storyboard you can imagine up! Let's get started.
1. You will start by creating a new document the size that you want your completed storyboard to be (in this case 10X20) by going to "File>Open" and this screen will pop up:
 Fill in the settings as shown - Name:Storyboard (or whatever you want it to be), Width: 20 inches, Height: 10 inches, Resolution: 300 (remember to use 300 because you want to print it), Background Contents: White. Press OK and let's continue!
2. Now open the three photos you want to add to your storyboard. To keep things simple, you will want your photos to be sized at 4X6 and 300 dpi. How do you check this? Click on the photo you want to check and go to Image>Image Size and it will show you. Do this with each photo to be sure you are working with a 300 dpi 4X6 inch photo. Got it?  3.Okay, now you will choose the photo you want to have in the center of the storyboard. Click once on it so the top of it is the darker color (where it says the name - see where my arrow is pointing below?). Okay, now be sure you have the move tool selected in your tools to the left (it's that black arrow) and click the arrow right on your photo. Holding the left mouse button down, drag the photo over to the white storyboard, then let the button up. A copy of your photo should appear on the white storyboard. Now you can close the original photo. Repeat these steps with each photo, closing the originals afterwards.
 4. In order to center the photos, you will want to see the rulers like I have below. To do this, go to the top of your screen, click on View>Rulers. Rulers like the one below should appear. Now you can center your middle photo. What I like to do with the other two, is drag them directly overtop the center one, then - while holding down the Shift key, I drag them to the left or right, which keeps them perfectly level with the middle one. Just move them around until you like where they are. If they aren't moving, be sure you have the correct photo highlighted in the layers pallette to your bottom right.
 5. Once you've got your photos positioned to your liking, you can add a little interest by adding a small border around each photo. In the layers palette, click on the first photo so it's highlighted. Go to Edit>Stroke and a little screen will pop up.
6.Enter the Width as 20px and then choose whichever color you want your border to be by clicking on the box next to the word "Color" and choosing a color. To keep things simple, I chose black. Click OK. Repeat these steps for the other two photos - remember, go to the bottom right of your screen, click on the photo you want to add a border to, then follow the above steps, only instead of re-entering all the info when the little screen pops up, just press OK. When finished, each of your 3 photos will have a small border around it. 7. I wanted to add some text, so I clicked on the text tool to the left (the "T"), then I chose my font and size at the top of the screen. I moved my mouse to where I wanted the text, then clicked once and started typing.
 8. You can completely be done at this point! It's a nice storyboard, and just think how nice it will look framed! However, I wanted to add a little extra border around all the photos, so I'll tell you how to do those steps now. I added a new layer by going to Layer>New>Layer or you can use the short cut (Shift+Ctrl+N).
 9. Using the rectangular Marquee tool (the dotted square in the tools palette to the left) I drew a rectangle around the photos and right through the journaling. If you want the border to be beneath the words, just draw the rectangle that way.
 10. Now I want to fill that rectangle with the same color as the background. So, I make sure white is the foreground color (the top of the 2 boxes in the tool palette) then I click alt+backspace to fill it in. (or go to Select>Fill). Your storyboard looks all white except for the "marching ants rectangle". It's okay - we'll fix that! Here is where you will add the stroke to make the line around the rectangle you just created. Click on Edit>Stroke and enter 20 pixels and make sure the color is black. Now a thin black outline will appear around the rectangle.
 11. If you look to your lower right hand corner, you'll see Layer 4 at the top of the list. You don't want your rectangle covering everything else, so you will click on it, and holding the mouse button drag it down so it is just above the background layer, then let up the mouse. Now you should see your photos and words again.
 12. Select your eraser tool and choose a hard edged square brush and set the opacity to 100%. (if you can't find the square brushes, they can be found by clicking on the tiny downward arrow beside where it says brush - look through those, and if you still can't find it, email me.)
 13. Now, I am going to erase the line that was going through my title so that the line stops right before the title and starts again right after it.
BEFORE:
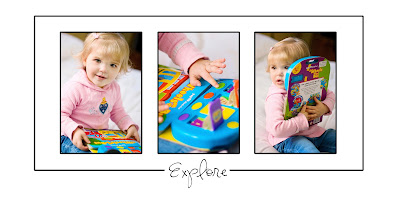
AFTER: That's it! I'm happy with it! Of course you can play around with spacing, photo positions, maybe adding a drop shadow to the photos etc. I hope you'll try to make your own storyboard soon. Please let me know how it works for you, or if you've run into problems. I am certainly not a photoshop guru, and sometimes I can't explain things as simply as is possible - so please let me know when something is fuzzy, or plain isn't working. Here are a few examples of what I've done - just see where your imagination takes you!


3 comments:
I am very excited to try this one! Jonas is going to eat cereal for the first time tonight. If I get some cute shots I'll have to story board it on my blog! I've always wanted to know ho wto do this. So thank you!
Bobbi - you are so kind...thank you so much for doing this for me!!!
I love your tutorials! They are so great!!
Post a Comment